This guide explains how to configure a custom source in Actuals. Custom sources allow you to ingest data from systems that are not supported by a native integration.
Prerequisites:
- A CSV file containing records that needs to enter Actuals.
- “Data source Manager” role in Actuals
Setting up a new source involves these steps:
Step 1: Determine the Journal Entry1.1 Identify the Transaction Type1.2 Determine the Desired Journal Entry for the Source1.3 Fine tune the entry to fit the accounting flowStep 2. Create the general ledger accountsStep 3. Analyze the file and create the sourceStep 4. Upload the fileStep 5. Determine and setup iterationsStep 6. Create the mapping per iterationDefault and iteration level mappingExample mappingStep 7. Process the fileProcessing Source Files
Step 1: Determine the Journal Entry
Before configuring a new source in the Actuals platform, you need to define what journal entry the platform should construct from that source's data.
1.1 Identify the Transaction Type
Start by understanding the nature of the data in your source file. Different transaction types have different accounting implications and will result in different journal entries. Ask yourself:
- What financial event does each record in this source represent? (e.g. a sale, a payment received, a refund, a fee)
- Is this source capturing an obligation (something owed or settled) or a cash flow (money movement)?
Correctly identifying the transaction type is essential, as it determines which journal entry should be created and which general ledger accounts should be debited and credited. In the table below you’ll find a list of the most commonly used transaction types in the order-to-cash process:
Transaction Type | Data usually contains these properties |
Invoice | invoice id, invoice date, invoice amount, vat amount |
Credit Note | invoice id, invoice date, invoice amount, vat amount, original_invoice_id |
PSP Payment | transaction id, merchant id, processing fee, timestamp, amount |
PSP Refund/Chargeback | transaction id, refundid, amount |
PSP settlement | id, PSP reference, merchant reference, type, debit amount, credit amount |
Bank statement | transaction id, booking date, transaction type, running balance |
1.2 Determine the Desired Journal Entry for the Source
With the transaction type identified, you can define journal entries that Actuals should construct for each record in this source.
Below you’ll find an (expandable) list with transaction types and their corresponding basic journal entries. These proposed journal entries give good starting point but can be altered for customer specific needs.
Invoice
Credit Note
PSP Payment
PSP Refund / Chargeback
PSP Settlement
Bank statement (Settlement)
1.3 Fine tune the entry to fit the accounting flow
Once you know what type of transaction you are dealing with and its default journal entry verify if it works for your accounting flow.
With the accounting flow we consider all the sources that will be connected to the actuals platform and we’ll verify the entries follow each other nicely.
For example if we have an order-to-cash flow where we have identified these transaction types:
- Invoice
- PSP Payment
- PSP Settlement
- Bank Statement
We can create a schema verifying the accounting flow would give the desired outcome.
Transaction Type | GL - Accounts receivable 🔀 | GL - Revenue | GL - VAT | GL - PSP Balance | GL - PSP Fee | GL - Clearing PSP settlements🔀 | GL - Bank balance | Total |
Invoice | 121 | -100 | -21 | 0 | ||||
PSP Payment | -121 | 120 | 1 | 0 | ||||
PSP settlement | -120 | 120 | 0 | |||||
Bank statement | -120 | 120 | 0 | |||||
Total | 0 | -100 | -21 | 0 | 1 | 0 | 120 | 0 |
Creating an equivalent schema for own setup can help to verify each general ledger account will end up with the desired outcome after the full accounting flow has completed. Also can help to identify which individual journal entries might need changes.
In this example schema we can see the “Invoice” and “PSP Payment” transaction type will post to the “Account Receivable” general ledger account. For this account we want to activate reconciliation, so we can verify which invoice has been paid.
When setting up a new source, always keep the accounting flow in mind: the journal entry you define must produce entries that post to the shared General Ledger account on which the reconciliation will take place. In this example, both the Invoice source and the Payments source post to the Accounts Receivable GL account - one on the debit side, one on the credit side. It is the entries from these two sources within that single account that Actuals will reconcile against each other.
Step 2. Create the general ledger accounts
Now you know which journal entry (Step 1) you want to create. The general ledger accounts as part of these journal entries must be created in Actuals first. For a detailed walkthrough on creating a general ledger account in Actuals, refer to the guide below (expandable).
Add a General Ledger Account [GUIDE-9]
Step 3. Analyze the file and create the source
With the journal entry defined and the general ledger accounts created, the next step is to create the source in Actuals. At this stage you are only completing the initial source configuration (not the mapping). The second and third steps related to data mapping will be handled in a later step once the sample file is uploaded to Actuals.
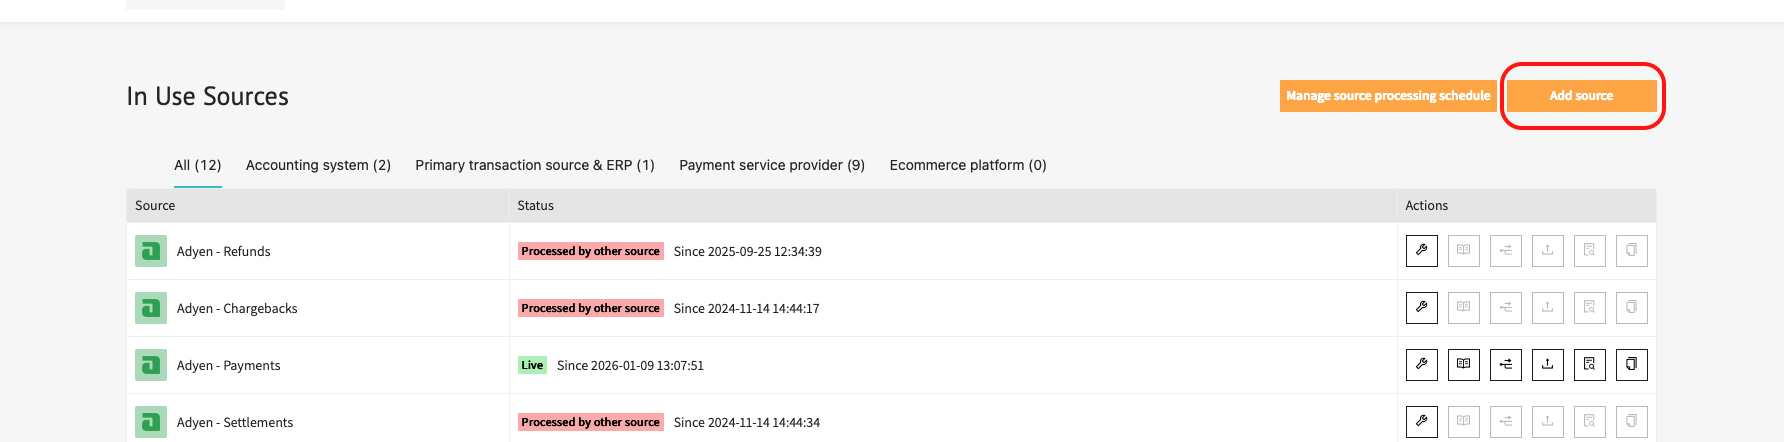
- Open the Actuals platform → navigate to Configuration → Sources and click “add a new source” . Work through the source setup as follows:
- Source Configuration: Select the appropriate integration connection, when providing a custom CSV format choose “Actuals SFTP” .
- Complete the general source settings (at least):
- Name: The name to idenfity your source
- Separator: Make sure to correctly set the CSV delimiter. Often “,” or “;”
- Headers: set the headers from the CSV file
- At this stage leave the ‘’Column reference’’ setting to default. For guidance on the other fields refer to this page:
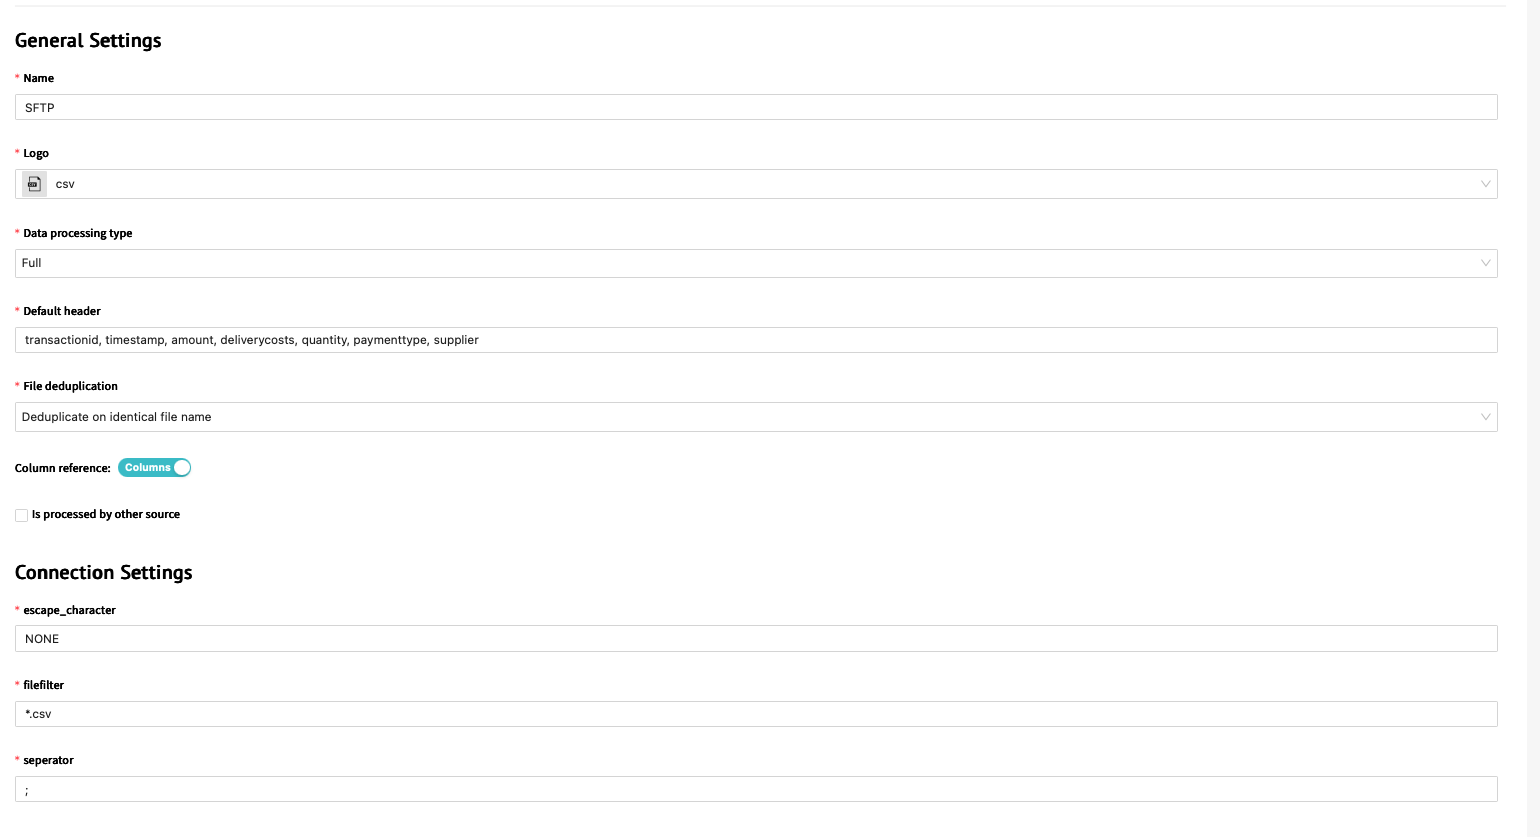
- Source Iterations and Source Mapping: Leave at default settings and save the source. We’ll come back to these steps later
- Now the source has been created successfully and the source becomes available for file upload.
Step 4. Upload the file
With the source created, upload your sample file to Actuals so this sample data becomes available for testing your mapping.
- Navigate to the source you just created and open the Source File Upload page. Upload your file by either dragging it into the upload window or browsing to it manually. Before uploading, make sure the file's delimiter matches the delimiter configured for the source - if these do not match, values will not be split (parsed) correctly.

Note that the file size limit for uploads via the web app is 20MB. If your file exceeds this, use an SFTP client to upload it instead. For SFTP upload refer to this guide:
Uploading a file to the Actuals SFTP server [GUIDE-5]

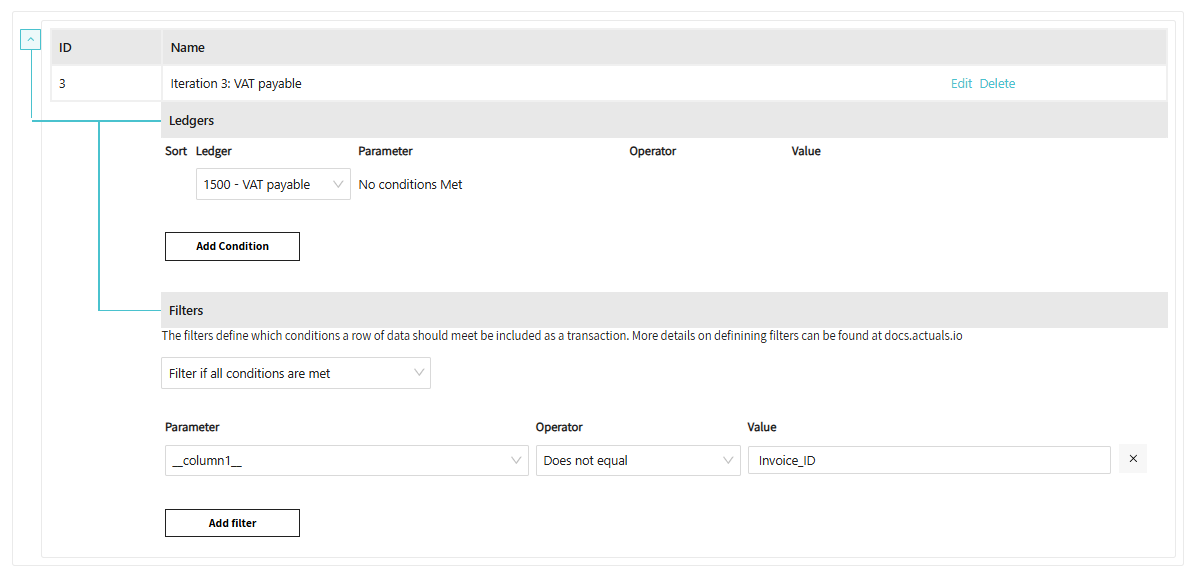
Step 5. Determine and setup iterations
Now the file has been uploaded we can start configuring the details of the file conversion. Converting a (raw) file to the desired journal entries consists of a multi-step mapping process.
- First you determine the iteration settings. The iteration settings determine how many output rows (journal entry lines) will be created from one input row.
- Second you create the mapping formulas.
Please follow our separate guide for setting up iterations (expandable below):
Setting up iterations [GUIDE-11]
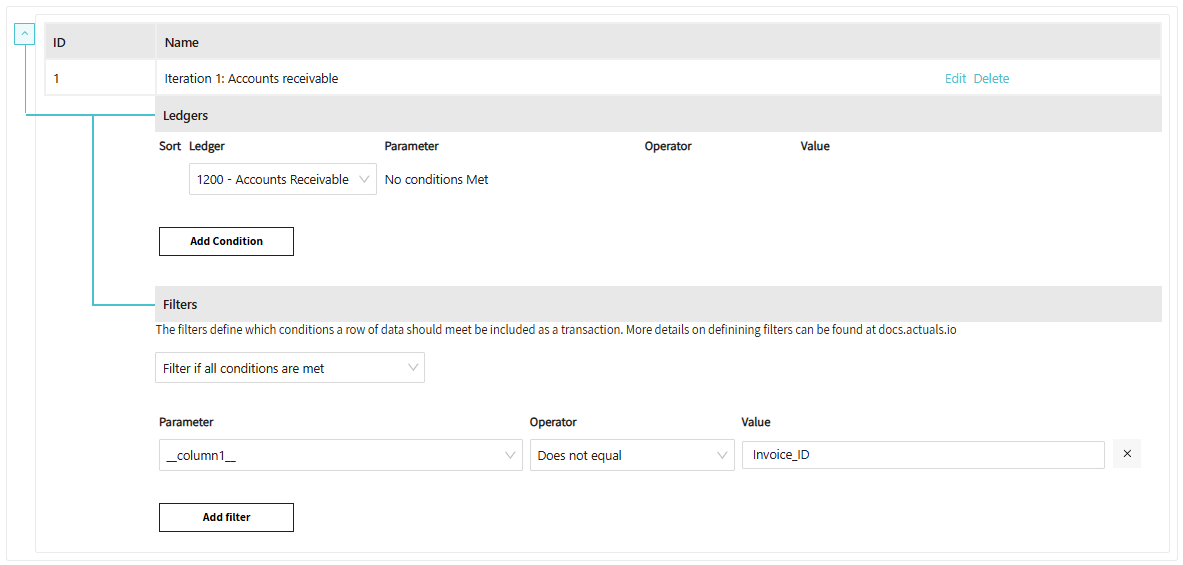

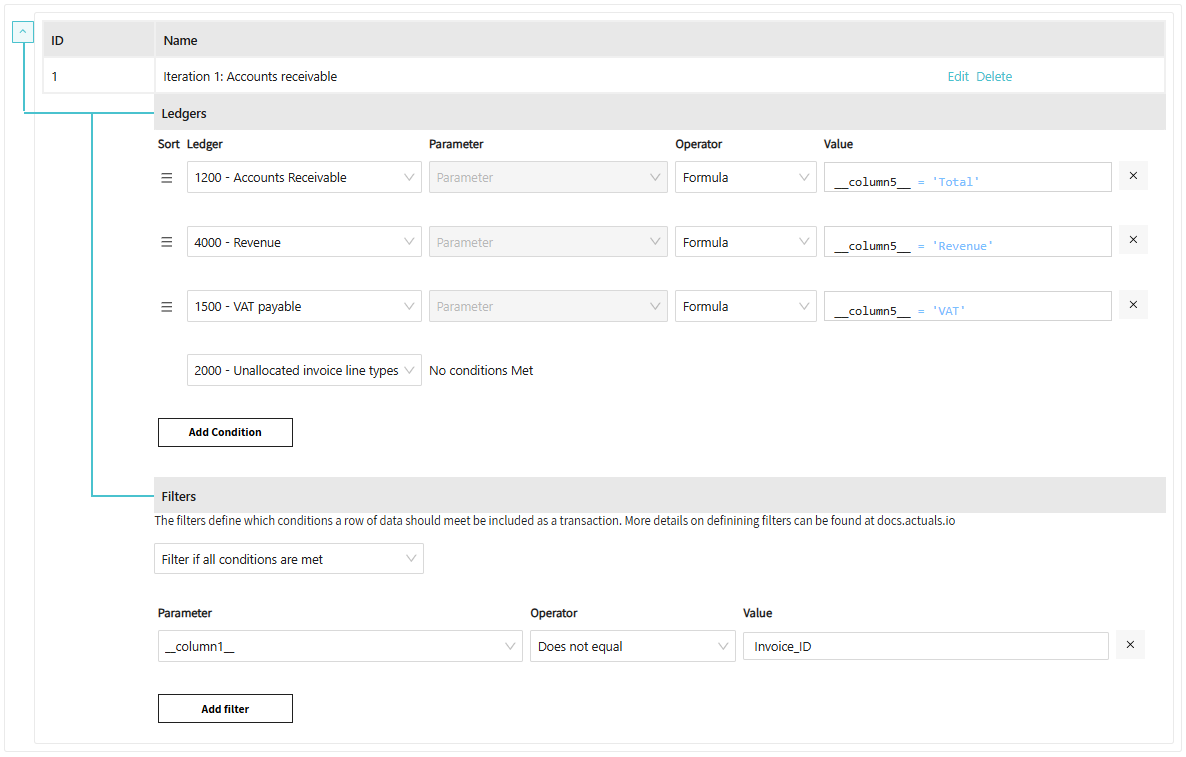
Step 6. Create the mapping per iteration
With the iteration setup step it’s determined which journal entry lines are created. The mapping of the properties for these journal entry lines still needs to be configured. This is performed in the mapping step. The mandatory properties to map are: “Timestamp”, “Transaction ID” “Amount” and “Currency”.
Default and iteration level mapping
You can provide the mapping on two levels. Default level and iteration level. If a property needs to be mapped in the same way for all iterations. Provide the mapping on Default level. If a different mapping is required per iteration you can provide the mapping on iteration level.
Example mapping
For a full overview of mapping options and functions available in Actuals, refer to the Source Mapping Guide.
Before saving any mapping configuration, it is strongly recommended to test it first. A Test mapping button is available beneath each iteration's mapping settings. It applies the mapping to the first few lines of a selected source file, giving you a quick way to verify the output is correct. This test is entirely read-only and has no impact on any data processing.

Step 7. Process the file
Processing Source Files
Once the ledgers, iterations and data mapping have been configured for a source the final step is to process the source file. Upon processing the input file the journal entries get created in the transaction table.
To process files:
- Navigate to Configuration → Sources → Processing Details. This page lists all files available for the selected source, including their names, sizes, and statuses.
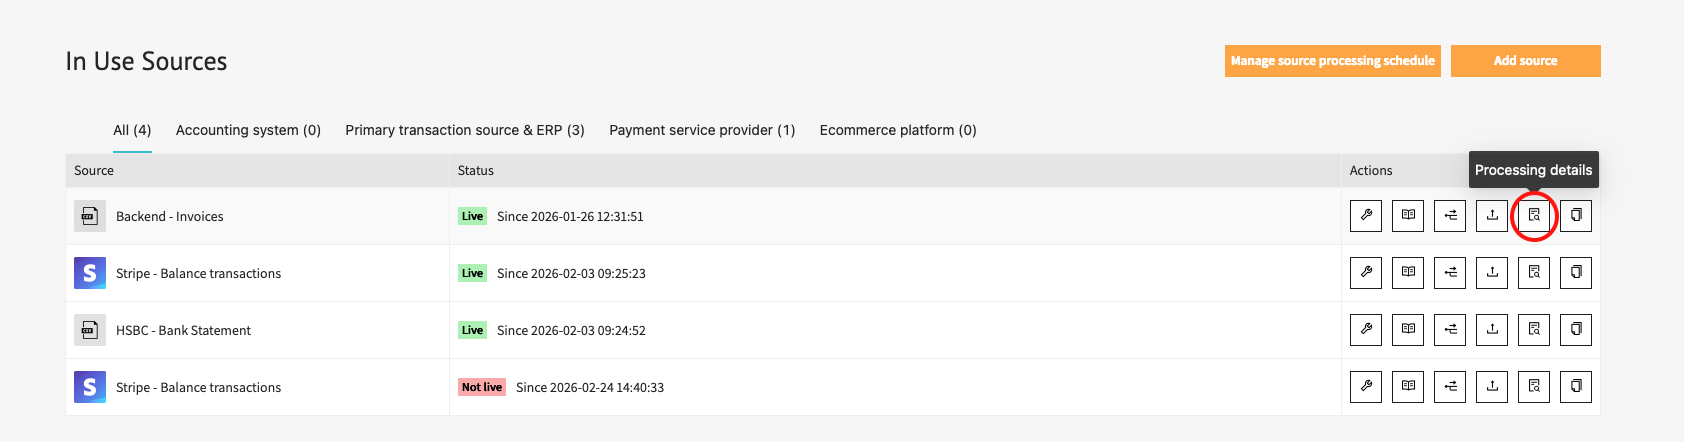
- Select the files you want to process by checking their checkboxes. Then open the Action dropdown in the top-left corner and select Reprocess files. A green checkmark in the top-right corner confirms that processing has started successfully.
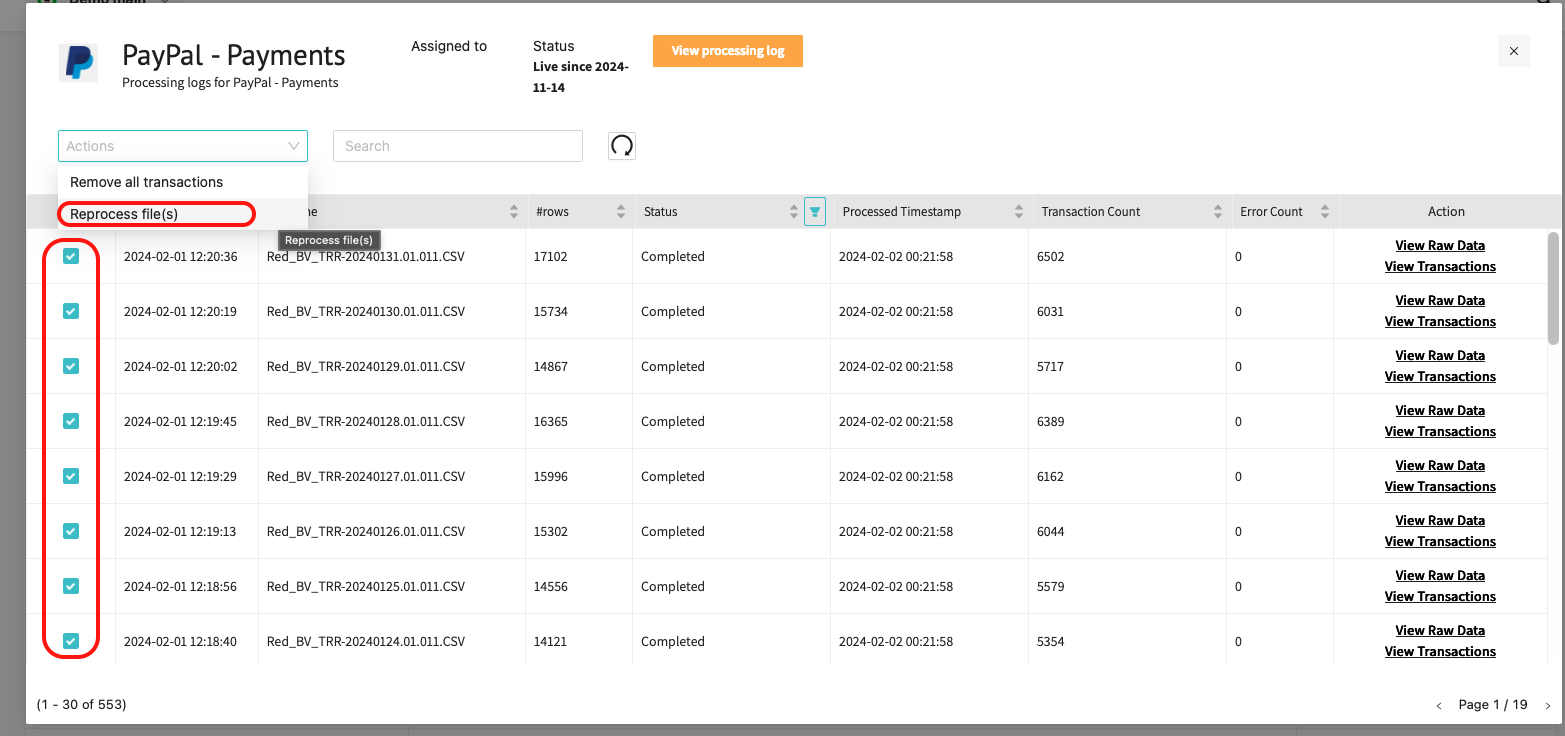
- Processing status: While a file is being processed, its status changes to Being processed. Once finished successfully, the status updates to Completed. To review the full processing history click Processing log. It displays the files processed. the processing duration and the results of the individual steps taken during file processing.
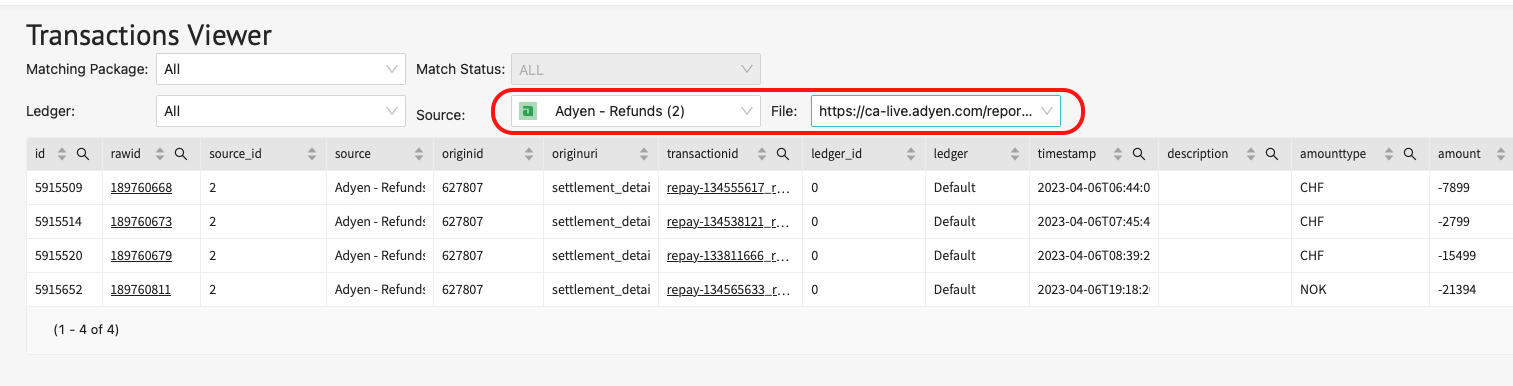
- Viewing extracted transactions: After processing completes, the extracted transactions are available in Configuration → Transactions Viewer. Use the filters there to narrow results by source, matching package, or ledger. Viewing the extracted transactions for a specific file:
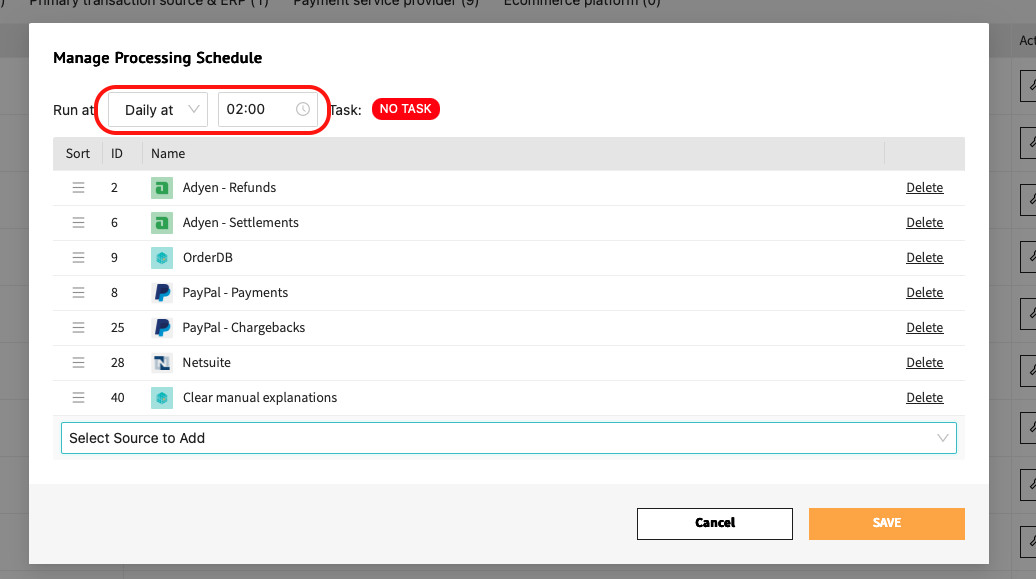
- Setting up a processing schedule: If data is received on a regular and predictable basis, it is worth setting up an automated processing schedule. Click Manage source processing schedule to configure this. You can choose between daily or weekly processing at a specified time, and select which sources should be included in each scheduled run.