
Adding a credential to Actuals [GUIDE-1]
To add a credential to Actuals:
- Sign in to Actuals and navigate to “Configuration” → “Credentials”
- Click “Add new credential”
- Provide a desired name for the credential.
💡
As a best practice we suggest to use the combination of the application name and the account the credential is part of. For example “Adyen - European Merchant”
- Provide the desired credential type.
- Dependent on the type you will be asked to provide one or more credential parameters.
- Click “Create” to add the credential.
You now successfully created the credential. Please inform your Actuals implementation consultant once you successfully added the credential in Actuals.
Working with JSON data in Actuals [GUIDE-2]
Actuals allows two functionalities related to JSON structured data.
- Extract data from a JSON string
- Create a JSON string
1. Extract data from a JSON string
The Actuals platform allows to extract data from a JSON string inside a column. Imagine a file is provided that contains a column with a string of JSON data, for example a csv file that looks like this:
header name: ID
header number: __column1__ | header name: JSON_DATA
header number: __column2__ |
Item 1 | {“orderId”:”order123”} |
Item 2 | {“orderId”:”order124”} |
Item 3 | {“orderId”:”order125”} |
If we want extract the orderId from the json string we can use this formula:
sqlJSON_EXTRACT_PATH_TEXT(<column_identifier>, '<path_name>')
In this example the
JSON_DATA column is the column we want to look for. The column is located as second column. We need to define this with the column number, in this case this is the second column so you should use __column2__. The path is orderId, to extract the orderId we will create this formula:sqlJSON_EXTRACT_PATH_TEXT(__column2__, '"orderId"')
It is also possible to extract nested data, for a more comprehensive guide on how to use this formula see: Snowflake JSON_EXTRACT_PATH_TEXT documentation.
2. Construct a JSON String
Actuals also supports the use case to construct a JSON object from source data. Imagine a file that provided that contains a column with a string of JSON data, for example a csv file that looks like this:
ID | payment_method | payment_method_variant |
Order 1 | Creditcard | VISA |
Order 2 | Creditcard | VISA |
Order 3 | Creditcard | Mastercard |
If we want construct a json object containing all information about the payment method used for a orders we can use this formula:
OBJECT_CONSTRUCT('<column_key>', '<column_value>', '<column_key2>', '<column_value2>')In this example we want to construct a object containing columns
payment_method and payment_method_variant The columns are located as second and third column in the source data. We need to define this with the column number, in this case this is the second and third column so you should use __column2__ and __column3__. To construct the object we will create this formula:
OBJECT_CONSTRUCT('payment_method', __column2__,'payment_method_variant',__column3__).For a more comprehensive guide on how to construct objects see: Snowflake OBJECT_CONSTRUCT documentation.
Working with XML data in Actuals [GUIDE-3]
Actuals contains functionality to work with XML structured data. The available functions are:
- Extract properties from a XML column
1. Extract properties from a XML column
The Actuals platform allows to extract data from XML data inside a column. Imagine a file is provided that contains a column with a string of XML data, for example a csv file that looks like this:
ID | XML_DATA |
Item 1 | <order><orderId>order123</orderId></order> |
Item 2 | <order><orderId>order124</orderId></order> |
Item 3 | <order><orderId>order125</orderId></order> |
If we want to extract the orderId from the XML string we can use this formula:
sqlXML_EXTRACT_XPATH_TEXT(<column_identifier>, <xpath>)
In this example the
XML_DATA column is the column we want to look for. The column is located as the second column. We need to define this with the column number, in this case this is the second column so you should use is __column2__. The path is order --> orderId, to extract the orderId we will create this formula:sqlXML_EXTRACT_XPATH_TEXT(__column3__, '/order/orderId')
To specify the path of the data you are looking for, we are using the XPATH standard.
More information on what possibilities you have to extract data can be found in the XPath specification.
ℹ️
The XML_EXTRACT_XPATH_TEXT function will return NULL if the provided XPATH doesn’t exist in the XML string (similar to the JSON_EXTRACT_PATH_TEXT function).
When the XPATH returns multiple results it will return a value error. Make sure you always provide an explicit XPATH function that returns a maximum of 1 result. If you want to test the result of a XPATH formula on a certain XML string you can use an online XML XPATH evaluation tool like Xpather.
Exchanging large datasets via compressed CSV files [GUIDE-4]
When sharing large files with Actuals, there are optimizations that can enhance the process compared to using uncompressed .csv formats. Utilizing compressed formats can significantly reduce data exchange times and storage requirements. Actuals supports various compressed CSV data formats. These compressed files can be unpacked by Actuals before being loaded into their system.
Benefits of Using Compressed Formats
- Reduced Data Exchange Time: Compressed files are smaller in size, which means they can be transferred more quickly over the network.
- Storage Efficiency: Compressed files take up less space, making them easier to store and manage.
- Compatibility: Actuals can handle various compressed formats, ensuring flexibility in how you share your data.
Supported Compressed Formats
Actuals supports the following compressed formats for CSV files:
.csv.gz(Gzip)
.csv.zst(Zstandard)
.csv.zstd(Zstandard)
.csv.bz2(Bzip2)
.csv.deflate(Deflate)
.csv.raw_deflate(Raw Deflate)
Steps
- Compress Your CSV File: Use a compression tool to compress your CSV file into one of the supported formats.
- Share the Compressed File: Once your file is compressed, share it with Actuals using the agreed-upon method (for example SFTP).
- Unpacking by Actuals: Actuals will unpack compressed files in the formats listed above and load the data into the system.
ℹ️
Using a compressed format can reduce the file size with a factor 10 compared to an uncompressed format.
ℹ️
As a guideline, considering file compression becomes relevant when uncompressed files reach approximately 250 MB and are shared regularly.
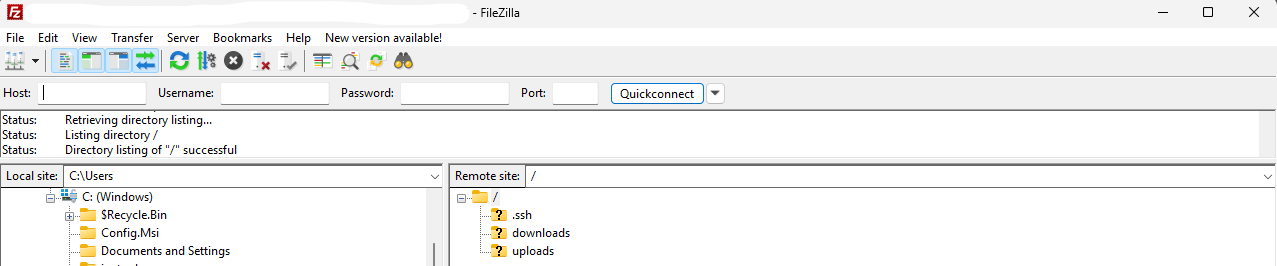
Uploading a file to the Actuals SFTP server [GUIDE-5]
To upload a file to the Actuals SFTP server you two things:
- An SFTP client. This is a program you install on your computer . An example is FileZilla.Please contact your internal IT department to install the FTP client recommended by your company.
- SFTP credentials - you can request these at your Actuals Implementation Consultant.
This manual assumes use FileZilla to interact with the Actuals SFTP server .
- Launch FileZilla on your computer. Locate the QuickConnect bar, which is typically at the top of the main window, just below the toolbar.
- Server/Host:
sftp.actuals.io - Username: Provided by your implementation consultant
- Password: Provided by your implementation consultant
- Port:
22

- Click Quickconnect. You are now connected to the Actuals SFTP server.
- You see a “local site” and “Remote site” section.
- By dragging files from Local side to the Remote side you can Upload files.
- At the bottom section you see the “Queued Files”, “Failed transfers” and “Successfull transfers” section. If you correctly uploaded files you will see the files appear on the “Remote side” and the task are also visible in the Sucessfull transfers section.
- The FileZilla interface shows two sections: • Local Site: Your computer’s files • Remote Site: Files on the Actuals SFTP serverTo upload files:
- Drag files from the Local Site to the Remote Site.
- At the bottom of the window, you’ll see three tabs
- Queued Files
- Failed Transfers
- Successful Transfers
- When files are uploaded correctly: • They appear in the Remote Site section. • The transfer status is visible under Successful Transfers.
Add a General Ledger Account [GUIDE-9]
In Actuals you can maintain a Chart of Accounts. To add a new General Ledger Account:
- Sign in to Actuals and navigate to “Configuration” → “Ledgers”
- Click ‘’Add new ledger’’
- (Optionally) Provide your desired logo.
💡
Logo’s are displayed in several reports and can help to distinguish data from different sources (like different PSP’s visually easily). Actuals provides a predefined list with available logo’s.
- Provide the Ledger Code
💡
The general ledger account code is a property you can define and modify to match your with your schema in your ERP.
- (Optionally) provide the Code Addition
💡
The code addition property is reserved for accounts identifiers at Payment Service Providers or banks. When you want to add multiple accounts of the same PSP you can use fill this property with you account identifier.
- Provide a desired name for the Ledger
- Choose a balance type
💡
Define if the general ledger account belongs to the Balance or Profit & Loss statement.
A third option “Not Affecting” is available, this option can be used to store analytical information not affecting your balance or profit & loss statement.
- Provide a name for the Ledger Category, i.e. Balance Sheet
💡
The category property can be used to define a reporting structure for a general ledger account. You can create a reporting structure consisting of multiple levels. Use the forward slash “/” as separator for the reporting structure levels.
- Currency Revaluation - choose not allowed, unless advised otherwise
💡
Currency revaluation allows you recalculate the value of foreign currency amounts in the general ledger. When this setting is set to “Revaluation allowed.” This general ledger account is available for currency revaluation. When set to “Not Allowed” this general ledger account will be excluded.
- Global Code
💡
Actuals comes with a predefined general ledger account schema for certain PSP integrations. This global code property is used to link a general ledger account inside a customers administration to the Actuals global schema. You don’t need to populate this property unless you want to upgrade from a custom connector to the Actuals pre-defined one without adding new general ledger accounts to your administration.
- Click ‘’Create’’
Importing opening balances [GUIDE-10]
Importing Opening Balances into Actuals
Opening balances represent the financial position of your organization at the start of using Actuals (commonly at the start of new financial period). Importing them correctly ensures that all subsequent transactions, reports, and reconciliations are accurate. This guide explains how to import opening balances into the Actuals platform.
Prerequisites
Before you begin, ensure that:
- Your Chart of Accounts (GL accounts) already exists in Actuals
- Any required matching package is configured
- You know the cutover date for which the opening balances should apply
Step 1: Create a Source for Opening Balances
Opening balances must be imported via a dedicated Source so they are clearly identifiable and auditable.
- Navigate to Configuration → Sources
- Create a new source
Recommended settings
- Name:
Opening Balances
- Type: Actuals SFTP
- For detailed instructions, see our sources page.
Step 2: Create the Opening Balances CSV File
2.1 Determine the number of lines to be provided per GL Account
The number of transaction lines to be provided in the csv file per GL account depends if the general ledger account is included in a matching package.
For GL accounts not subject to matching, opening balances can be provided as a single line per GL account (and per required subanalysis combination, such as entity or currency).
Examples include:
- Bank accounts balances
- Most non-operational balance sheet accounts
In these cases:
- No match key is required
- A single aggregated opening balance is sufficient
- Matching logic is not applied going forward
For GL accounts that are part of a matching package (for example: Accounts Receivable, Accounts Payable, clearing accounts), opening balances should be provided per match key.
This means:
- Each row represents a unique GL account + match key combination
- Match keys typically represent items such as:
- Invoice reference
- Settlement reference
- The sum of all rows for a given GL account must equal the total opening balance of that account
Providing balances at match-key level enables Actuals to:
- Continue matching historical balances with future transactions
- Accurately track open and settled positions over time
If a customer cannot fully specify the opening balance across all match keys, they can still proceed by:
- Providing opening balances for all known match keys
- Assigning the remaining (unspecified) balance to a dedicated match key:
opening_balance_not_specified
This ensures that:
- The total opening balance remains correct
- Matching can still occur for the known portion
- The residual balance is explicitly tracked and isolated
✅ Best practice: Always ensure the sum of all match-key rows (including
opening_balance_not_specified ) equals the balance from the source system.Balances assigned to the
opening_balance_not_specified match key are treated as valid opening balances but are not automatically matchable to specific transactions.Over time, customers can:
- Match future transactions against known match keys as usual
- Explicitly write off or clear transactions against the
opening_balance_not_specifiedopening balance when details become available
- Gradually reduce the unspecified balance without compromising historical accuracy
This approach allows customers to:
- Start with correct balances
- Improve matching quality over time
- Avoid blocking go-live due to incomplete historical detail
2.2 Identify the Opening Balance Date
- Choose a single posting date for all opening balance entries. This is typically the last day of the previous financial period (e.g.
2025-12-31).
All rows in the file should use the same posting date.
2.3 Identify the GL Accounts
- Use the GL account numbers as configured in Actuals
- Each general ledger account located on the balance should typically have one line in case there isn’t matching activated.
- For general ledger accounts located on the balance sheet for which a matching package is activated matchkey level details need to be provided.
- General ledger accounts located on the Profit & Loss should usually start at zero.
2.4 Identify amounts and currency
- Use signed amounts (provide debit amounts as positive, credit amounts as negative)
- Assets: typically positive
- Liabilities / Equity: typically negative (depending on your accounting conventions)
- Make sure debits and credits balance overall
- Provide the amounts in the same currency that future transactions will be provided. In case of multi currency. Provide the opening balances in the foreign currency amounts.
2.5 Sample CSV Format
CSV
javascriptdate,source,gl_account,amount,currency,match_key,description
2025-12-31,openingbalances,1000,5000000,EUR,,opening balance HSBC bank EUR account
2025-12-31,openingbalances,1300,12100,EUR,INV-10001,AR opening balance customer 1 invoice 10001
2025-12-31,openingbalances,1300,24200,EUR,INV-10002,AR opening balance customer 2 invoice 10002
2025-12-31,openingbalances,1300,500,EUR,opening_balance_not_specified,AR opening balance - unspecified
2025-12-31,openingbalances,0900,-86800,EUR,,opening balance
Common columns
date: Opening balance date
source: Must match the source created earlier
gl_account: GL account identifier in Actuals
amount: Opening balance value
currency: Transaction currency
match_key: Required when subanalysis applies
description: Optional but recommended
✅ Tip: It is possible to upload multiple versions of the opening balance file and remove previous versions before importing a new file. Start with a small subset of accounts to validate formatting before uploading the full file.
Step 3: Upload the Opening Balances File
- Navigate to Configuration → Sources → Select the “Opening balance” source → Upload File
- Upload the CSV file
Step 4: Create the Mapping
- Go to Configuration → Source → Iterations
- Assign the general ledger accounts
- Go to Configuration → Source → Mapping
- Ensure all fields are correctly mapped:
- Date → posting date
- Amount → signed amount
- Match key → subanalysis mapping
If subanalysis exists:
- Confirm the match key resolves to a valid subanalysis combination
- Fix any unmapped or ambiguous values before proceeding
Step 5: Process the File and Validate the Opening Balances
5.1 Process the File
- Run the import processing job
- Ensure the job completes successfully
5.2 Validate the Results
After processing, validate the opening balances:
- Balance Sheet Report
- Confirm total debits equal total credits
- Verify that balances match your source system exactly
- General Ledger Account Details
- Confirm one entry per GL account (and subanalysis combination)
- Confirm the match keys are populated correctly
✅ Recommended check: Export a balance sheet from Actuals and reconcile it with your legacy system.
Setting up iterations [GUIDE-11]
1.1 Iterations core concept
Iterations determine how much journal entry lines will be created from each raw line and which conditions (filters apply) for creating a transaction line. Because 1 iteration only looks at each line of raw data once, it can only produce one journal entry line for that line during that pass.
1 iteration pass equals 1 journal entry line per 1 raw line.
Term | Description |
Raw file | A raw file is an unprocessed (raw) version of the data provided by the customer. If a customer provides a CSV file, that csv file without any alternations is referred to as the raw file. |
Input file | See raw file. Because the customer provides raw files as input to Actuals. The raw file often is referred to as the input file. |
Raw line | A raw line refers to one row inside a raw file. |
Raw table | In this table Actuals stores all raw lines provided by the customer. |
Output line | An output line in relation to the source processing process is a line created in the Actuals transaction table. An output line will be created from a raw line that via an iteration with the configured mapping is converted to an output line |
Transactions table | In this table Actuals stores processed data. The journal entry lines can be found here. |
How it Scales
- The 1:1 Scenario: If you only need one journal entry line per line of raw data, you only need one iteration.
- The Multi-Entry Line Scenario: If you need to generate multiple journal entry lines from a single line of raw data, you must set up multiple iterations (one for each entry line needed).
Quick Summary Table
Goal | Requirement |
1 Entry line per input line | 1 Iteration |
3 Entry lines per input line | 3 Iterations |
- Use an unallocated fallback general ledger account: When mapping general ledger accounts based on a type column (see example 2 in the next section), we recommend explicitly assigning each known type to its corresponding account. To handle newly introduced or unidentified types, add a fallback account (for example, 2000 – Unallocated invoice line types). This allows you to quickly identify unmapped types in the trial balance, update the mapping, and reprocess the file as needed.
- Explicitly assign general ledger accounts: Always use explicit mappings when assigning general ledger accounts. While positive and negative amounts can be used to distinguish invoices from credit memos, a dedicated type column provides a clearer and more reliable distinction and is therefore preferred when available.
- Prefer exclude filters over include filters: Apply filters carefully and favor exclude filters over include filters. For example, if a file contains both a header row and invoice lines, exclude the header rather than including only invoice lines. This ensures that if credit memos are added in future files, they are not silently ignored but are either processed or generate a clear error message, prompting corrective action.
- Align iteration order with journal entry structure: Order your iterations in the same sequence as the resulting journal entry. For invoices, this typically means starting with accounts receivable, followed by revenue and VAT accounts. Using this order improves readability and consistency.
1.2 How it works in practice
To help you see how the number of iterations changes based on the data structure, here are two examples of invoice files (CSV format) and how the "iteration" logic applies to each.
Example 1: Invoice Header-Level File
Structure: 1 line represents the entire invoice.
Invoice_ID | Date | Customer | Total_Amount | VAT_Amount | Revenue_Amount |
INV-1001 | 2026-04-22 | TechSolutions | 120.00 | 20.00 | 100.00 |
How many iterations are needed?
In this case, you need 3 iterations.
- Iteration 1: Walks through the line to create the Total_Amount entry line. Debiting the Accounts Receivable general ledger account with 120.
- Iteration 2: Walks through the same line a second time to create the Revenue_Amount entry. Crediting the Revenue general ledger account with 100.
- Iteration 3: Walks through the same line a third time to create the VAT_Amount entry. Crediting the VAT payable general ledger account with 20.
Because all three values sit on one input line, the system must "iterate" that same line three times to build the full journal entry.
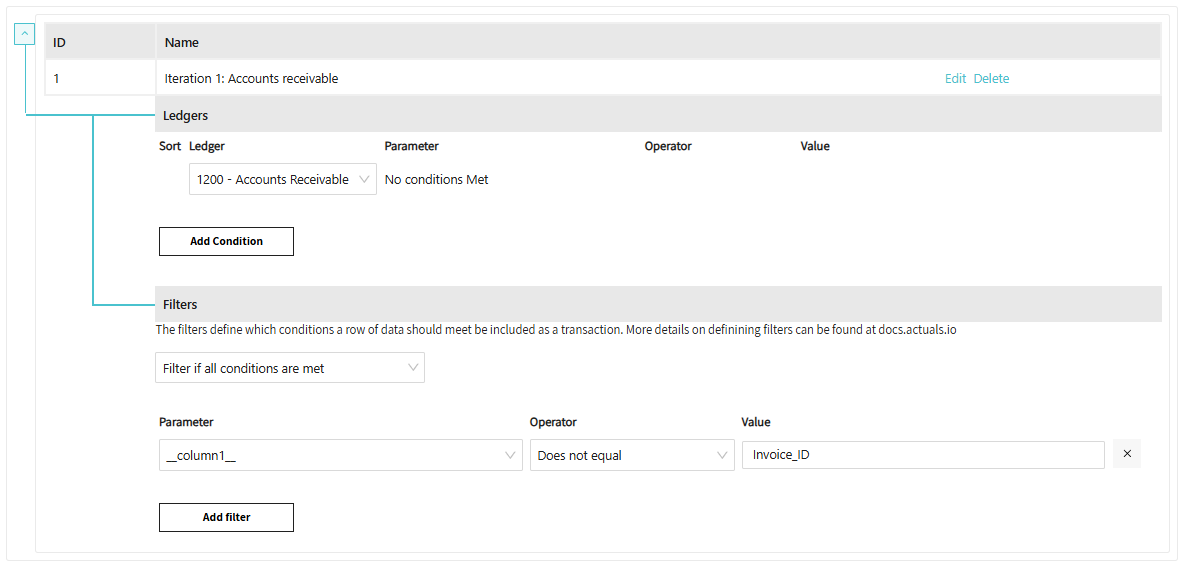
- Iteration 1: The Total (Accounts Receivable)
- Ledgers: Assign iteration to The “Accounts Receivable” General Ledger Account.
- Filtering: Ignore header rows. Column 1 doesn’t equal Invoice_ID
- Mapping (to be mapped during mapping step: Look at the
Total_Amountcolumn. Map $120.00 to the Debit side of the assigned ledger.
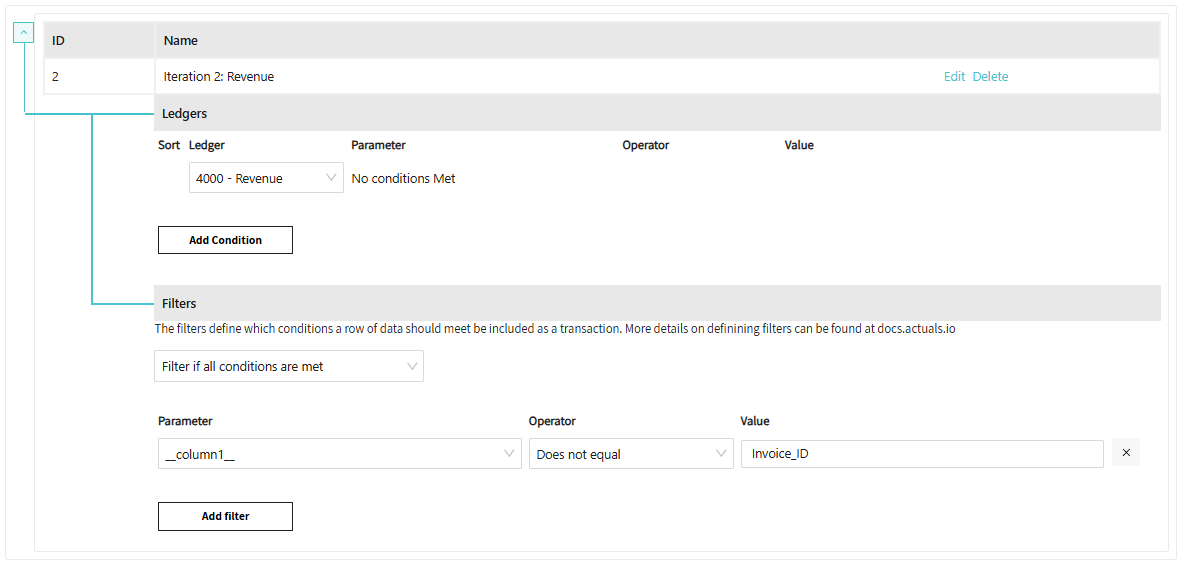
- Iteration 2: The Revenue (Net Sales)
- Ledgers: Assign iteration to The “Revenue” General Ledger Account
- Filtering: Ignore header rows. Column 1 doesn’t equal Invoice_ID
- Mapping (to be mapped during mapping step): "Look at the
Revenue_Amountcolumn." Map $100.00 to the Credit side of the Revenue Account.
- Iteration 3: The VAT (Tax Liability)
- Ledgers: Assign iteration to The “Revenue” General Ledger Account
- Filtering: Ignore header rows. Column 1 doesn’t equal Invoice_ID
- Mapping (to be mapped during mapping step): Look at the
VAT_Amountcolumn. Map $20.00 to the Credit side of the VAT Account.

Final Resulting Journal Entry:
Account | Debit | Credit | Originated from iteration |
1200 - Accounts Receivable | 120.00 | 1 | |
4000 - Sales Revenue | 100.00 | 2 | |
1500 - VAT Payable | 20.00 | 3 |
Why? Since the data is "flat" (everything is on one line), the system must revisit that line three times to generate the three separate sides of the accounting journal entry.
Example 2: Line-Item File
Concept: The file is already "pre-split" into three lines. You only need one iteration because the "Type" column tells the system what to do as it walks down the list.
Invoice_ID | Date | Customer | Amount | Type |
INV-1001 | 2026-04-22 | TechSolutions | 20.00 | VAT |
INV-1001 | 2026-04-22 | TechSolutions | 100.00 | Revenue |
INV-1001 | 2026-04-22 | TechSolutions | 120.00 | Total |
The Iteration (1 Scan Required)
Instead of multiple iterations, you use Conditional Logic within a single pass.
- Iteration 1: It walks through every line and asks, "What is the Type?"
- If Type = "Total": It creates a Debit for 120.
- If Type = "Revenue": It creates a Credit for 100.
- If Type = "VAT": It creates a Credit for 20.
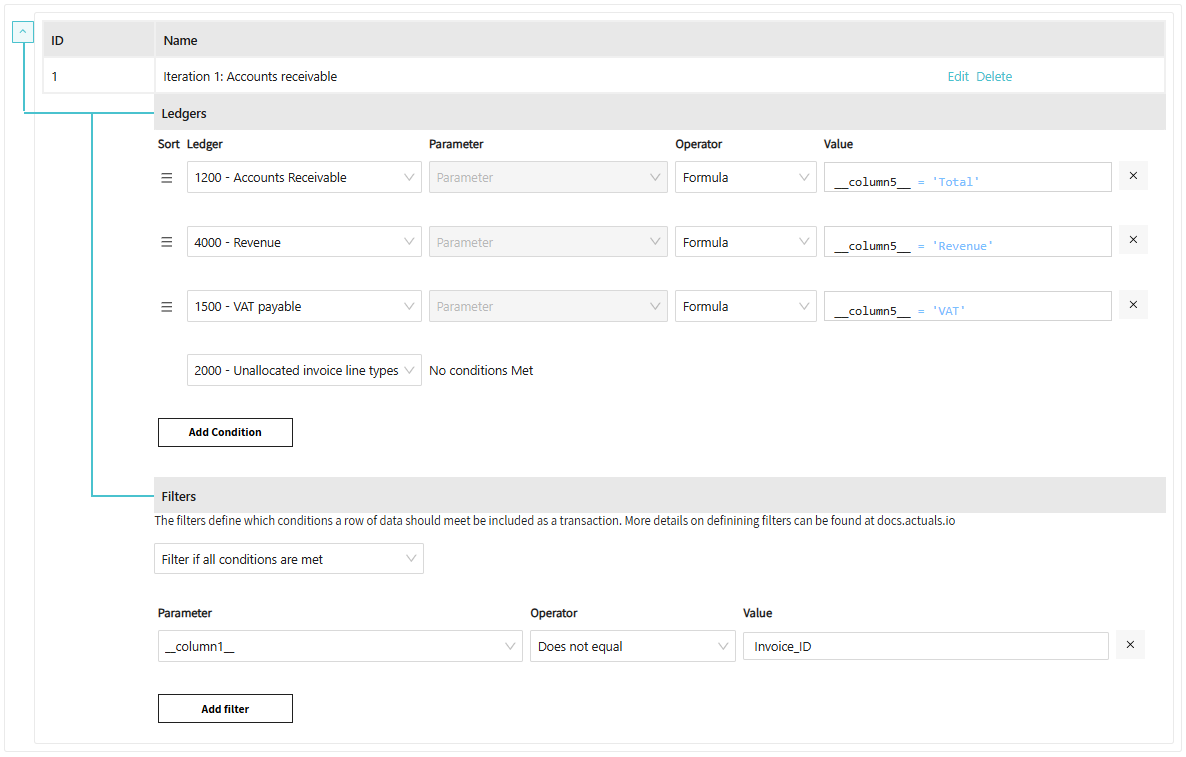
When assigning general ledger accounts based on a type column we recommend to explicitly assign each type to the desired general ledger account.
In the example above we created an additional general ledger account “2000 - Unallocated invoice line types” as a fallback to store still unidentified types. This way you can easily identify inside your trial balance if a unidentified line type was present in the file. To update your mapping and reprocess the file.
Be careful with applying filters. As a best practice we suggest to apply exclude filters instead of include filters.
When a customer provides a file with a header column and invoices. We suggest to exclude the header instead of including the invoices. If in a later file also creditmemo’s will be added to the same file. Including invoices will result in creditmemo’s not being processed.
Excluding creditmemo’s will be processed or result in an error. Giving the user feedback there is something to solve.
The resulting Journal Entry is the same:
Account | Debit | Credit |
1200 - Accounts Receivable | 120.00 | |
4000 - Sales Revenue | 100.00 | |
2150 - VAT Payable | 20.00 |
Key Takeaway: If your raw data file is "compact" (one line for everything), you increase the iterations. If your raw data is "detailed" (separate lines for everything), you can suffice with one iteration.
Setup a custom source (from A to Z) [GUIDE-12]
Link to dedicated page:
Setup a custom source (A-Z) [GUIDE-12]Manage source processing schedule [GUIDE-13]
Schedule Source Processing
A source processing schedule tells Actuals when to automatically process incoming data from your configured sources. This guide walks you through setting one up.
Prerequisites
Before creating a schedule, ensure that:
- The relevant Sources have already been configured in Actuals
- You know the desired processing frequency (daily or weekly)
Steps
1. Sign in to Actuals and navigate to Configuration → Sources
2. Click "Manage source processing schedule"
3. At the bottom of the window, select the source(s) you want to add to the schedule
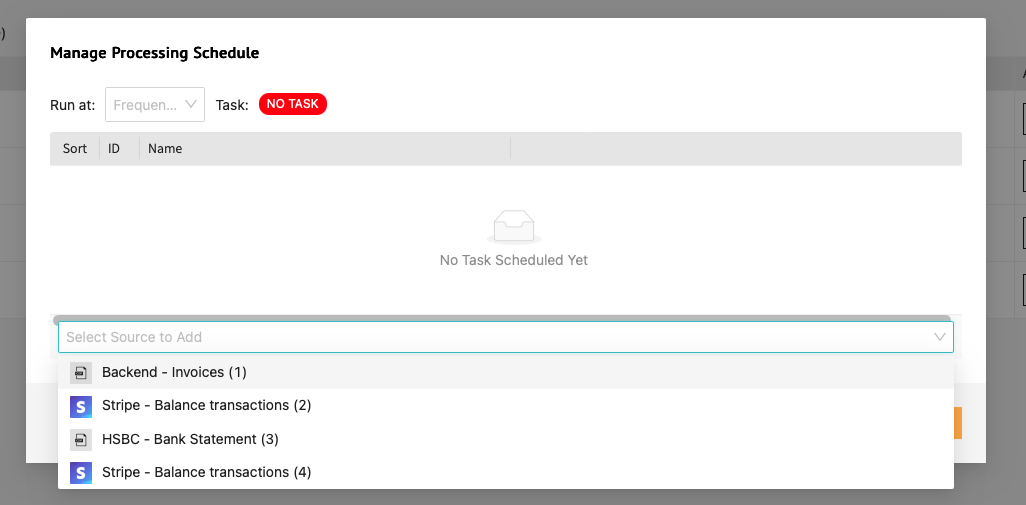
4. Choose a processing frequency:
Frequency | Required settings |
Daily | Time of day |
Weekly | Time of day + day of the week |
5. Click "Save"
💡 Best practice: Align the processing schedule with the time your source data is typically delivered. This ensures Actuals processes the most up-to-date files without unnecessary delays.
ℹ️ Relation to Matching Package schedules: The frequency and time set here can also be used as the schedule for any Matching Package that depends on the selected source(s). To ensure matching runs on the freshest data, configure the Matching Package schedule to start directly after source processing completes.
That's it — Actuals will now automatically process the selected sources on your configured schedule. You can return to this screen at any time to adjust or remove schedules.
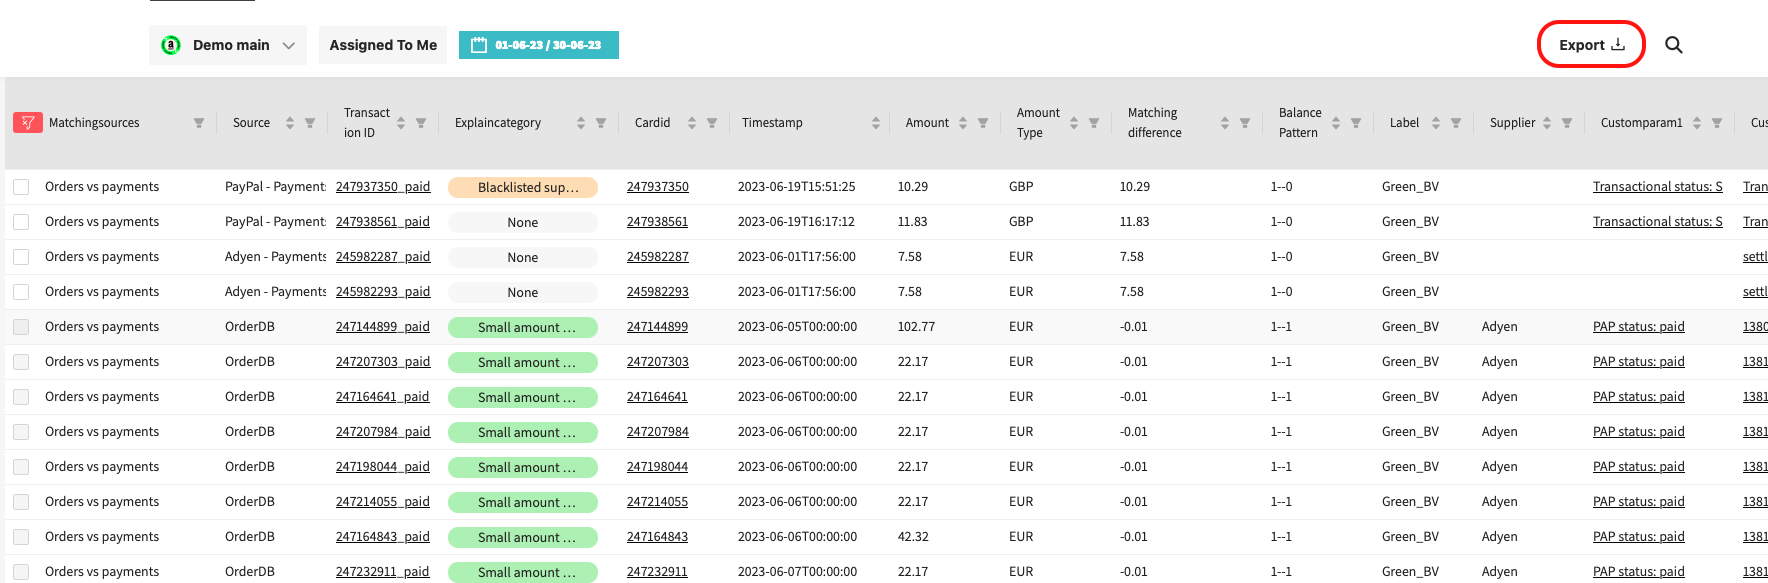
Export transactions to CSV [GUIDE-14]
Actuals allows you to export transactions to CSV from several places in the platform, giving you flexibility depending on whether you need processed transactions, raw data, or a filtered subset.
Steps
1. Sign in to Actuals and navigate to one of the following:
- Transactions — for processed, unmatched or explained transaction data
- Configuration → Transaction Viewer — for a detailed view of processed transactions
- Configuration → Raw Transactions — for unprocessed source data
2. Apply any desired filters to narrow down the data you want to export
3. Click "Export" in the top right corner
4. Choose your export scope:
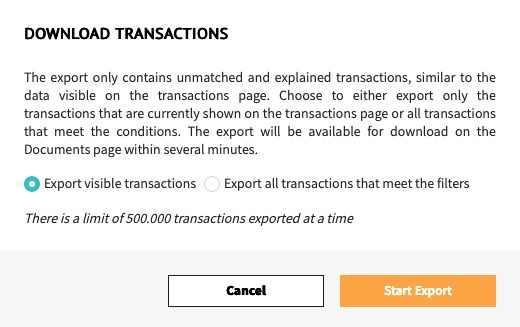
Option | Description |
Export visible transactions | Exports only the transactions currently visible on screen |
Export all transactions that meet the filters | Exports the full result set matching the active filters, regardless of what is visible on screen |
💡 Best practice: Apply filters before exporting to keep file sizes manageable and ensure you're only exporting the data you need.
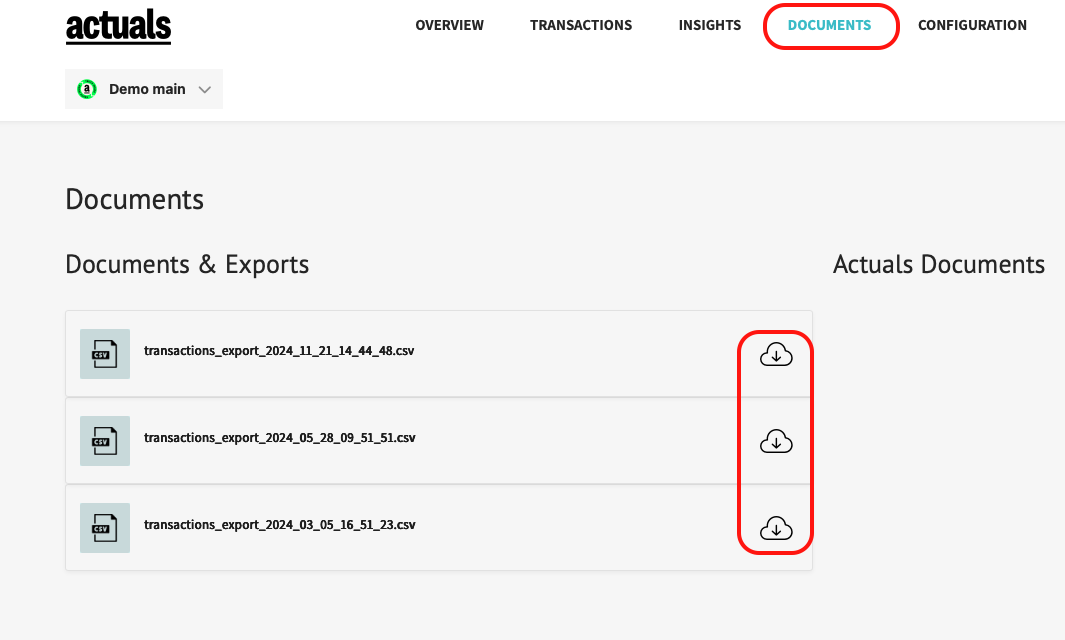
Your CSV file will appear in ‘’Documents’’ from where it can be downloaded.
Guides with dedicated pages:
Setup a custom source (A-Z) [GUIDE-12]