Introduction
The sources page provides an overview of all connected data sources to the Actuals platform. Commonly a setup contains sources from Payment Service Providers (Adyen, PayPal), Order/Invoicing database (Custom, Shopify) and ERP systems (Microsoft Dynamics Business Central, Oracle NetSuite).
Each source can have its own data collection mechanism. Data for common Payment Service Providers (PSP’s) is often automatically collected by Actuals via a standardized source. We call this a connector. More information about connectors can be found in the connectors section.
Source overview
The source overview page is used to manage data collection and data processing settings for each of the sources. Also some insights are available to see data collection and processing logs. Links are available to the Raw Data Viewer and Transactions Viewer to explore which data was collected and how it converted into transactions.
For each source several subpages are available:
- Source Configuration
- Source Iterations
- Source Data mapping
- Source File Upload
- Source Processing Details
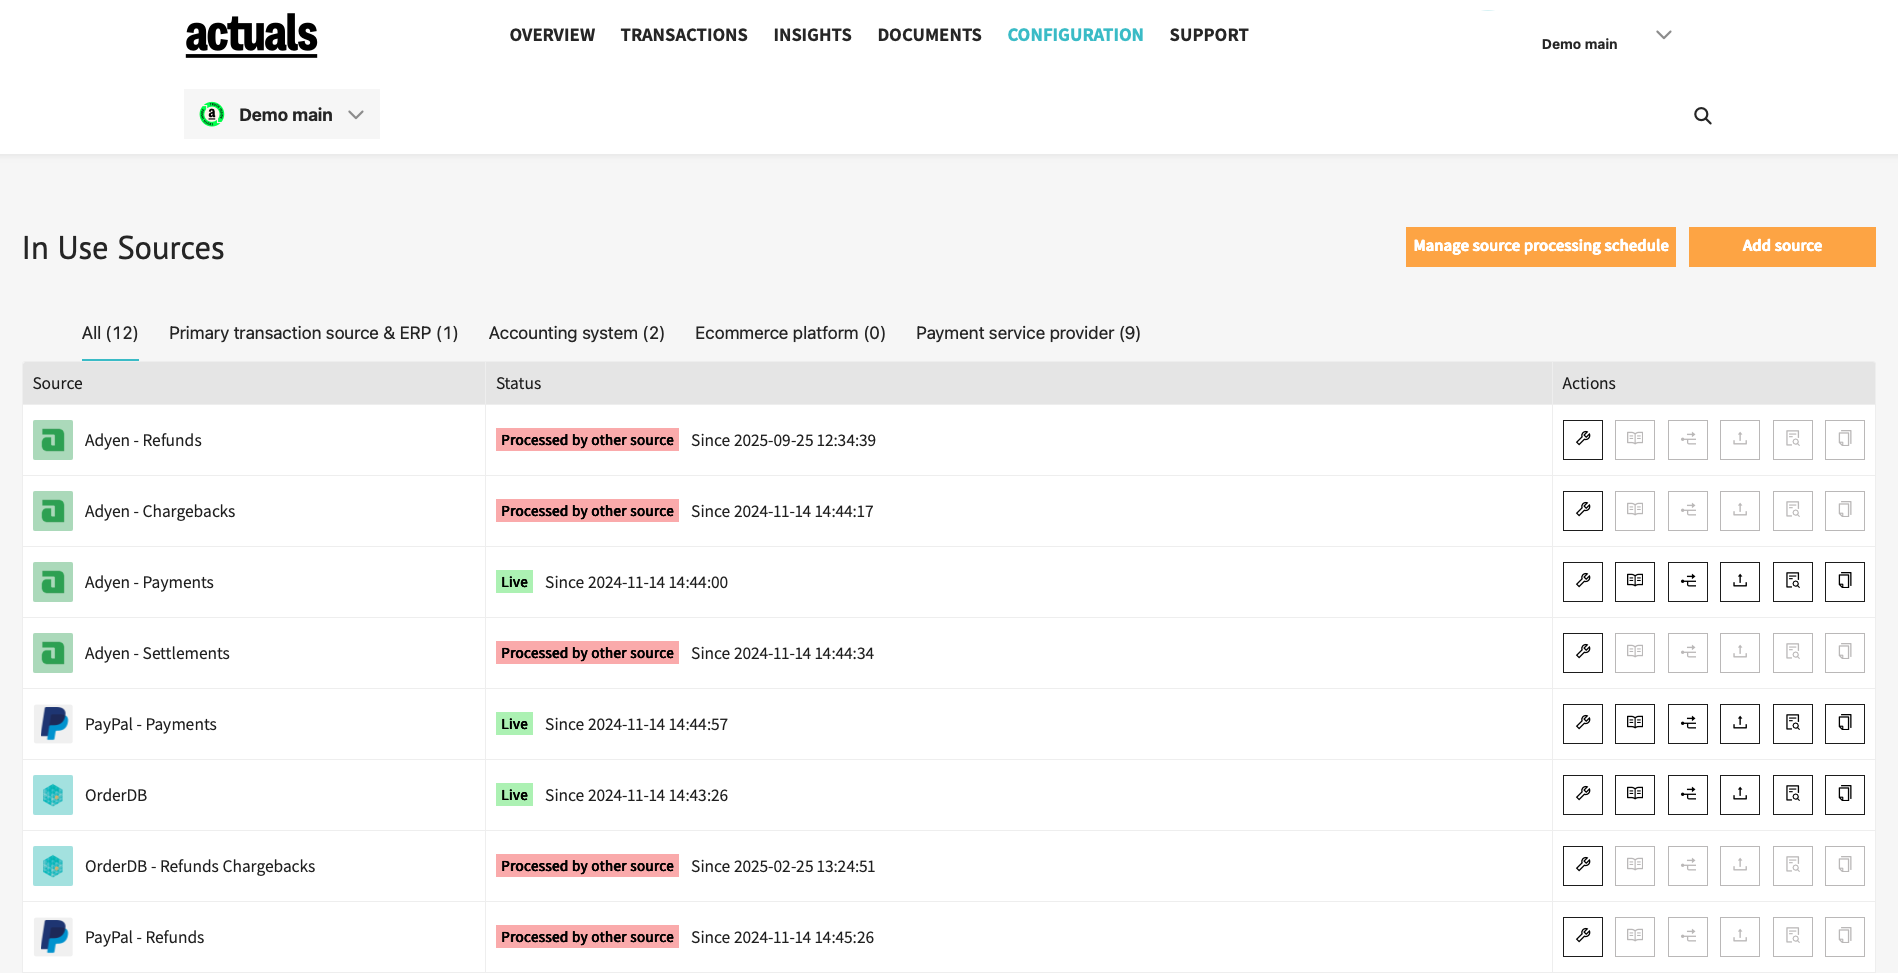
The “Source Configuration”, “Source Iterations” and “Source Mapping” pages are part of the source processing settings.
The “Source File Upload” page allows for uploading new files. The “Source Processing Details” allows to view collected data and processing statuses.
Source processing settings
1/3 Source Configuration
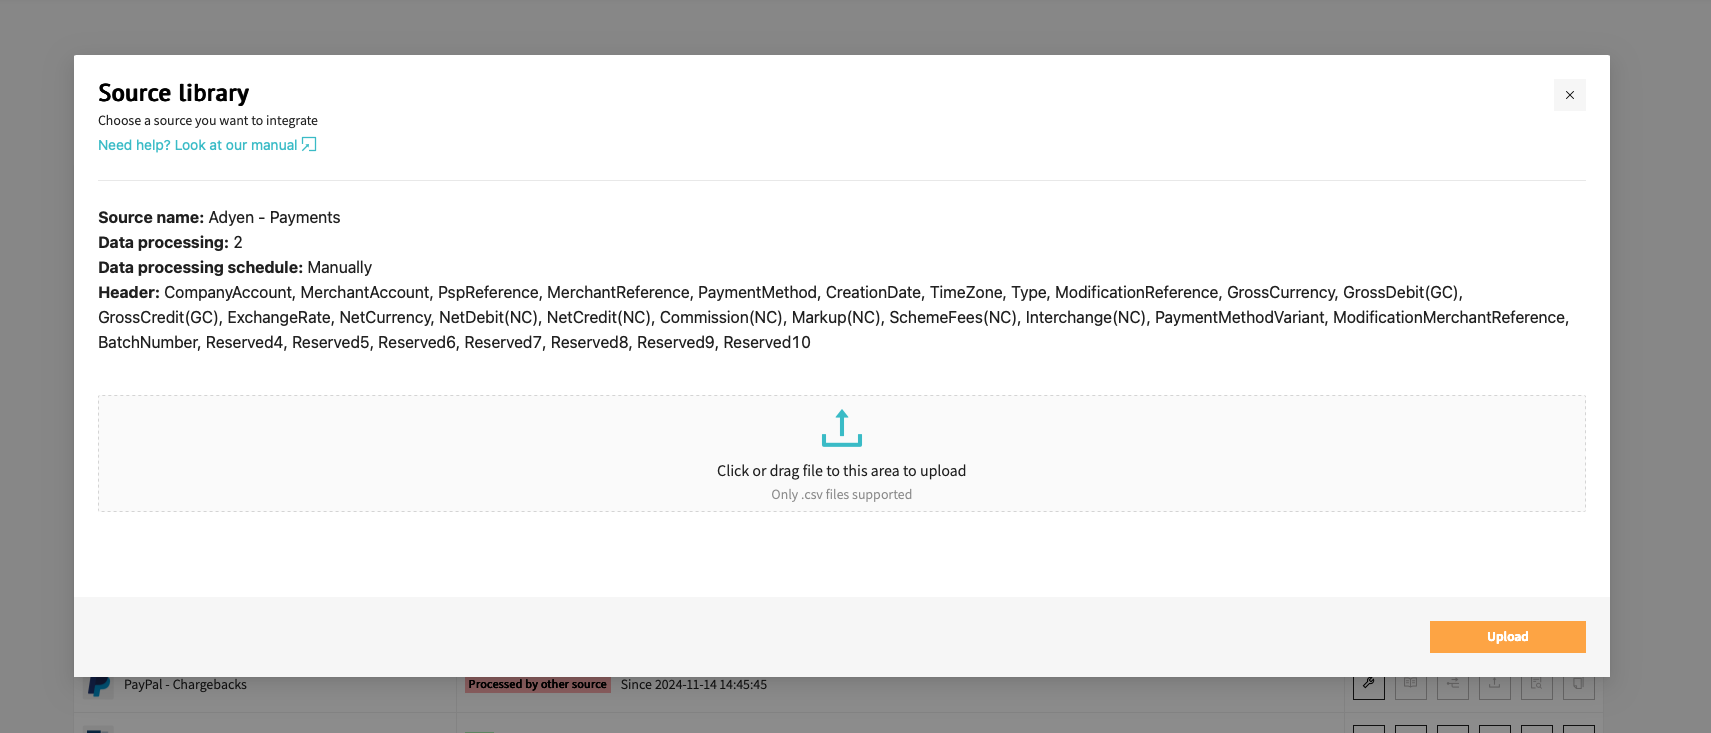
When adding a new source, the first step is to choose one of the integration connection that are available on the Actuals platform. The Integrations section contains a list of the specific setup for the specific connection. When working with files, the CSV upload integration is typically the best place to start. Once a connection is chosen for a source, it cannot be changed. The next step is to setup the general source configuration. While some of the options are specific to the connection, several general settings are always required
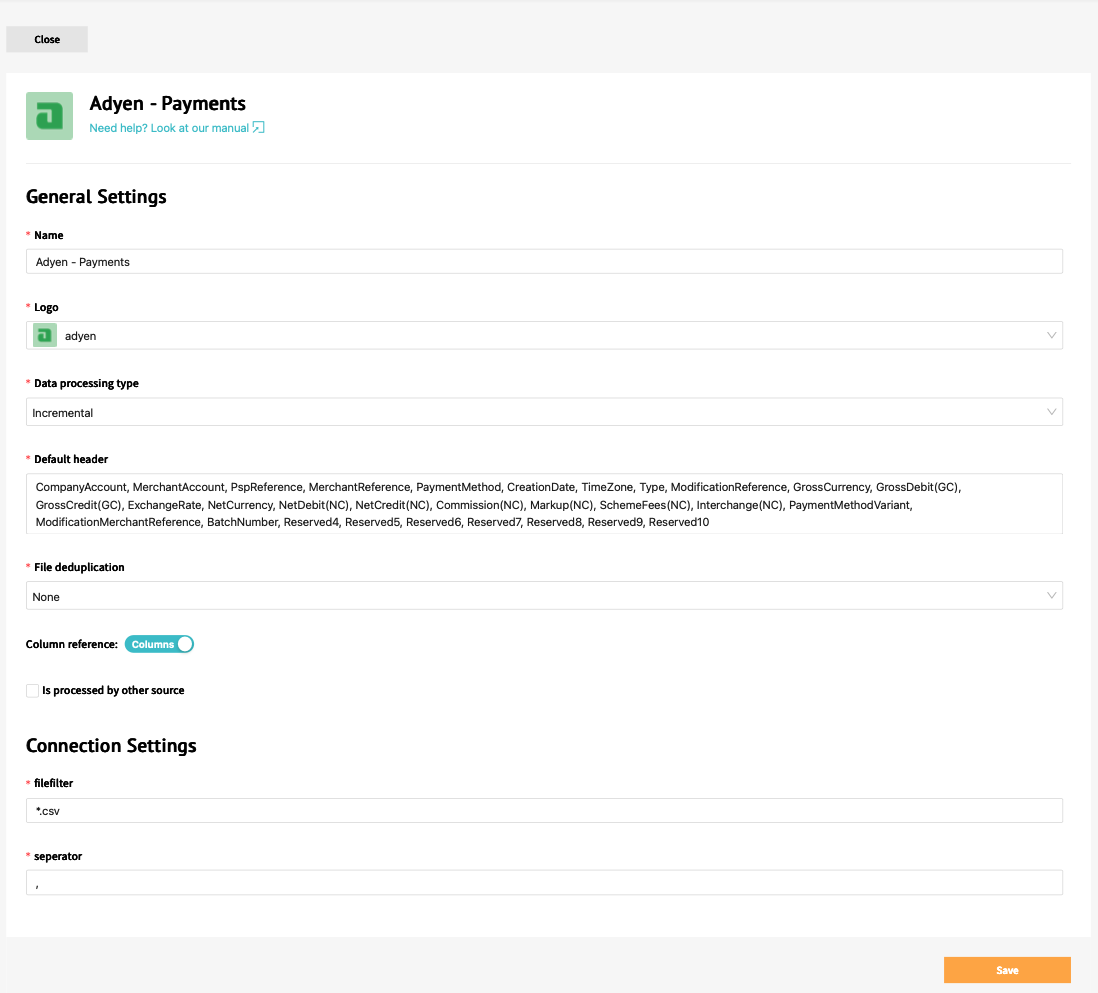
- Source name : the name of the source, used throughout the platform
- Data processing type : definition of how the files should be processed. Incremental means that all new files/data are added to the existing transactions, Full means that only the data from the most recent file is used (and data from all other files are removed)
- Default Header : Expected column names/properties when data is collected for a source
- File filter : What type of files should be processed.
- Separator : When processing files, how are the different values separated. When this is unclear and a sample data is available, we recommend opening it with a text editor and check how the values are split in the file
Typically when selecting a specific connection (that does not uses manual files), we recommend to leave these settings as is.
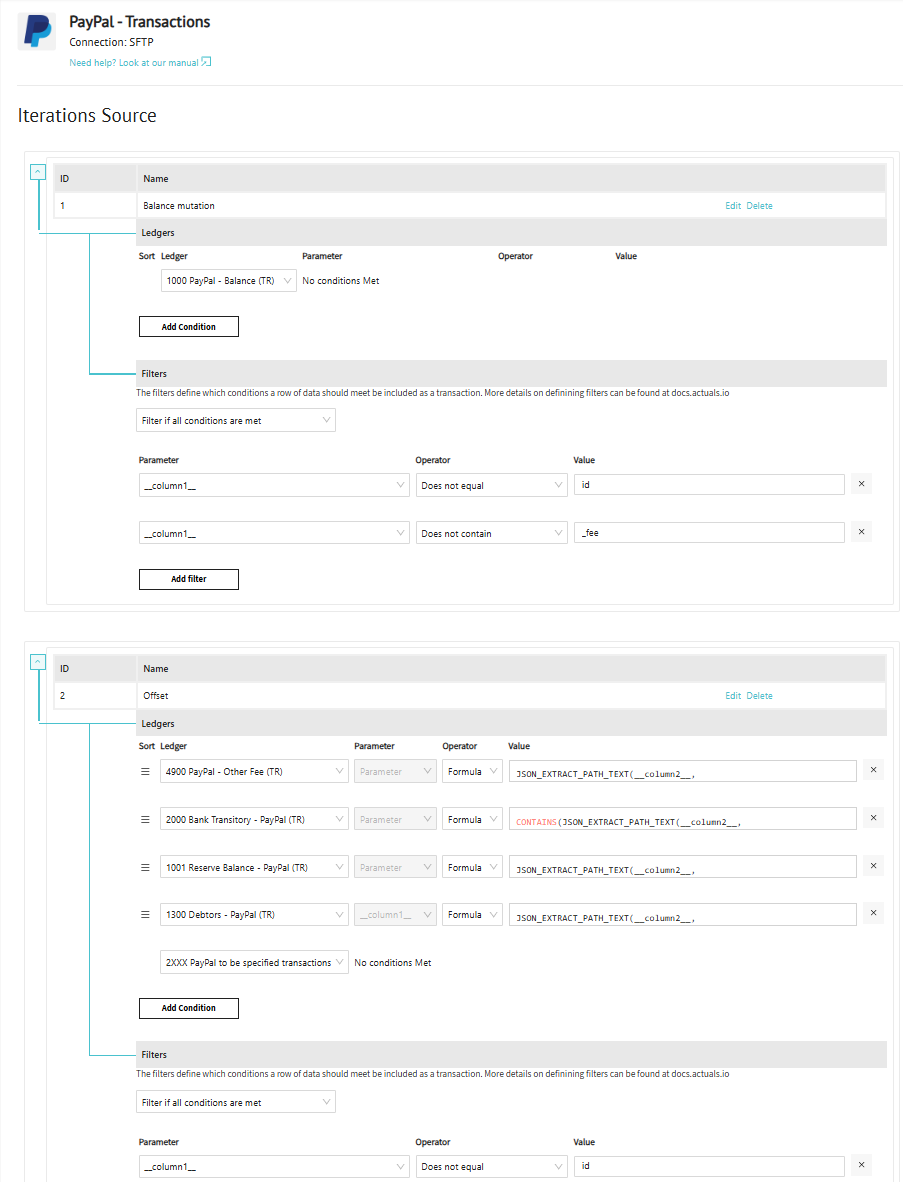
2/3 Source Iterations
In the source iterations page you define the logic that gets evaluated for each row in available for the Raw data rows loaded into the Actuals Platform. The source iterations page has multiple functions:
- Assign raw data rows to General Ledger Accounts
- Filtering raw data rows (excluding rows)
- Creating multiple transactions rows from a single raw data row (looping/expanding rows)
Assign General Ledger Accounts
Inside the ledgers section you can assign General Ledger Accounts to raw transaction lines.
3/3 Source Mapping
The final step in adding/editing a source is the data mapping. On this page, the data from the source is mapped to the properties of Actuals transactions. All Actuals transactions have transactionid, timestamp and amount as properties as well as many many more. This page not only allows users to map the columns from the input data to these properties but also apply formulas to further transfrom and customize the values. To use the value of a specific property, the value __columnXX__ should be used corresponding to the column number (XX is the number of the column) in the input data. Additionally functions can be use to further process the values. An example is the CONCAT function that concatenates the values of a list of properties. If for instance for the transactionid property the formula CONCAT(__column1__,”-“,__column2__) is used, the the transactionid property will be populated for this source by concatenating the values of the first column in the data with a - followed by the value in the second column. Below is a list of common functions and how to use them
TO_TIMESTAMP to convert input timestamps to Actuals timestamps.
CONCAT Concatenate several strings into one string.
- REPLACE Replace a specific value in a string with another string
- LEFT Get a fixed number of characters from a string starting from the left
- RIGHT Get a fixed number of characters from a string starting from the right
- SUBSTRING Extract a substring from a string
- SUBSTRING_INDEX Return a substring of a string before a specified number of delimiter occurs
- UPPER Convert the text to upper-case
- TRIM Remove leading and trailing spaces from a string
- FROM_UNIXTIME Returns a date /datetime from a version of unix_timestamp
- STR_TO_DATE Return a date based on a string and a format
- CONVERT Convert an expression to an integer
- CAST Convert a value to an int datatype
- ABS Return the absolute value of a number
- IF Use specific value per row based on conditions that are met
- CASE Go through conditions and return a value when the first condition is met
- OBJECT_CONSTRUCT Returns an OBJECT constructed from the arguments (to work with variant field types).
OBJECT_CONSTRUCT_KEEP_NULL Returns an OBJECT constructed from the arguments that retains key-values pairs with NULL values (to work with variant field types).
OBJECT_INSERT Returns an OBJECT value consisting of the input OBJECT value with a new key-value pair inserted (or an existing key updated with a new value).
OBJECT_PICK Returns a new OBJECT containing some of the key-value pairs from an existing object.
TO_JSON Converts a VARIANT value to a string containing the JSON representation of the value.
When applying these formula’s, the output should be strings / text. The only exception to that are the following parameters
- timestamp has type datetime and therefore is typically defined using either STR_TO_DATE or FROM_UNITIME
- amount , vatamount , quantity , source have type int and therefore is typically defined CAST. Note that amount and vatamount are specified in cents so to store 12.50 euro, the integer value 1250 should be provided
Apart from the mapping itself, filters can be applied as well. This means that specific rows are never imported as transactions. As an example a data set can have an column that contains the order status. It makes sense to filter the data for this source to only include rows where the order state column has the value “successful”. The filters applied are combined, so data is only imported if all filter conditions are met,
As getting the right columns, using the right formulas and applying the correct filters can be challenging, the bottom of the source configuration page contains a Test mapping section. After selecting a file, the Test mapping button can be used to apply the formulas and filters on the data in that specific file. This allows users to verify that the formulas and filter are correct in terms of syntax and also that the output is as expect. Note that this option is not available when initially creating the source as no data has been collected then. We highly recommend to always test the mapping before storing the source by clicking on Add at the bottom right.
We have specific guides available on how to work with JSON and XML data. You can check them beneath here.
File upload page
The upload file button creates a popup that can be used to upload a file with data for that specific source. A file can be provided by either dragging the file from explorer to the web page or by clicking the link in the popup and browsing to the file. Important is to check the delimiter set for the source as the uploaded file should have the same delimiter in order for the values to be split properly. There is a limit on the file size of files that can be upload through the web app. If the files are bigger than 20MB, then an sFTP client should be used to upload the files.
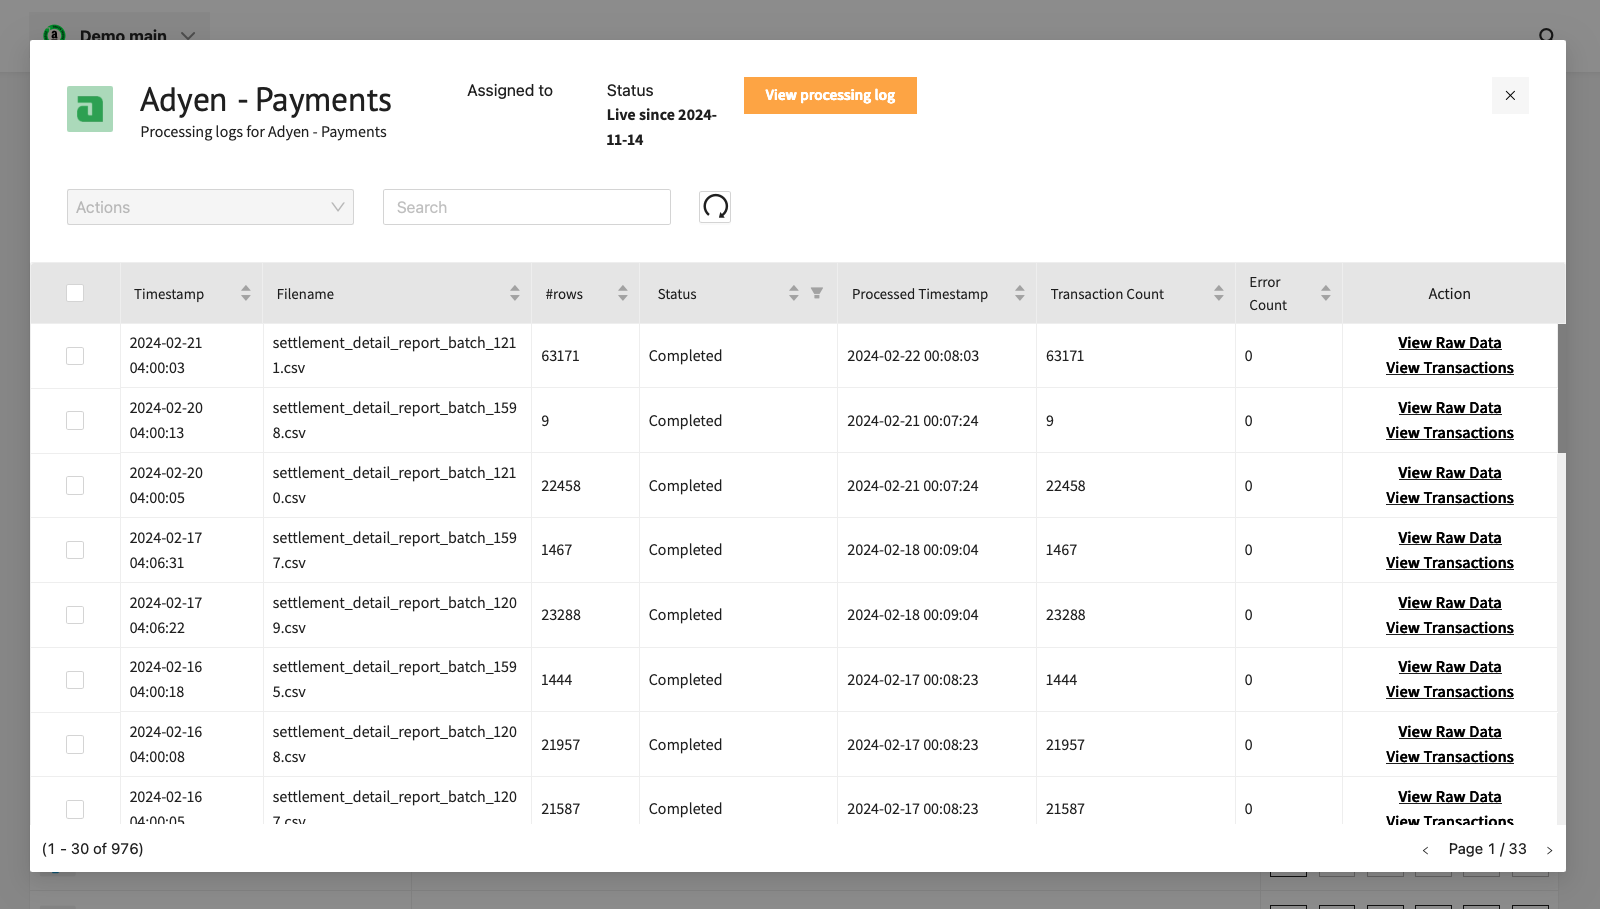
Processing details page
The Source processing details shows al files/data batches that have been collected for a source. The search box can be used to search on specific file names and dates. The check box can be used to select any number of files and apply any of the actions as the appear in the Action drop down at the top left corner. The list shows the following properties per item
- Timestamp : the date / time at which the data was collected in GMT+1
- Filename : the name of the file including the location on the fileserver
- #rows : the number of rows that have been stored for this item
- Status : either Complete, Deleted or Not processed. The status can be changed by applying the actions in the Action dropdown
- Processed Timestamp : The date / time at which the rows of data from the file were processed into transactions
- Transaction Count : The number of transactions that were processed. Typically this is equal to or lower that the number of rows as several rows are filtered out
- Error Count : The number of rows with an error
- Action : For the item, several specific links can be clicked. View raw data allows users to see some rows that were imported for this item. This gives a good impression of the data stored and any basic processing issues. Test raw data applies the current mapping to the data in this specific item, similar to the functionality on the mapping page. View transactions shows several transaction when the rows of the item have been processed into transactions
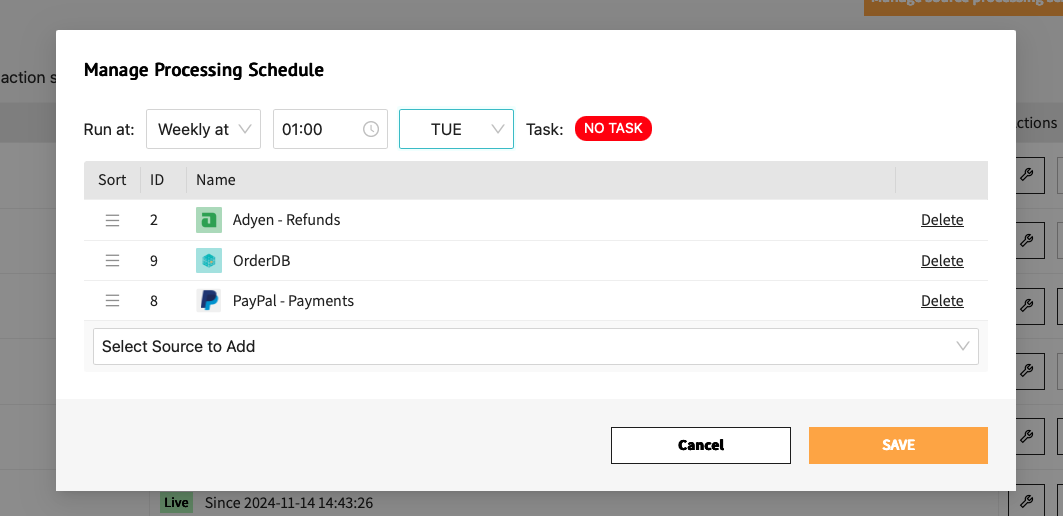
Processing schedule
The Actuals platform separates data collection from data processing. Data collection means collecting data from an external source. When using our PayPal connector data collection often is set to once a day, during the night just after the moment data becomes available at PayPal.
Data processing is the the conversion of the collected into transactions. In the data processing schedule you can define the moment and interval when collected data should be converted to transactions inside Actuals.
After choosing one or several sources, the schedule can be run on a daily or a weekly basis at a specified time